Welcome to FirstAid4Free

Welcome to my first aid site. I'm a first aid trainer and assessor. I've been teaching first aid for about 10 years now. Everyone should have some first aid knowledge for in the home and work place. Not everyone has the chance to attend a full first aid course so I'll provide some key first aid points every week.

Important Notice

The information on this site is for guidance only. The first aid procedures are those in the current edition of the First Aid Manual at the time of inclusion on the site. Attendance on a first aid course to practice these procedures is always recommended.

Burns and Scalds

The main priorities are to rapidly cool the burn, monitor the casualty's airway, treat for shock and get medical attention if necessary.

Types of burn:
There are 3 main categories of burn:
  • Superficial: Characterised by redness, tenderness and swelling. Only the very surface of the skin is affected. Sunburn is a good example.
  • Partial thickness: Characterised by redness, pain and blistering. The epidermis (top layer of skin) is completely destroyed. Large areas of partial thickness burns need medical attention.
  • Full thickness: The burn is deep through the layers of skin, which may be charred, waxy or pale. Usually not that painful due to nerve damage. Need urgent medical treatment.
Medical attention:
The following types of burn need medical attention:
  • Full thickness burns (all the way through the skin to the underlying tissue).
  • Burns to the face, hands, feet or genital area.
  • Burns which extent the entire way around and arm or leg.
  • Partial thickness burns larger than 1% of the casualty's body surface area (about the area covered by the palm of the casualty's hand).
  • Superficial burns larger than 5% of the casualty's body surface area (about the area covered by 5 palms).
  • Burns with a mixed pattern of varying depths.
  • Any burn you are unsure of - better safe than sorry.
Treatment:
  • Cool the burn area with cold liquid for at least 10 minutes.
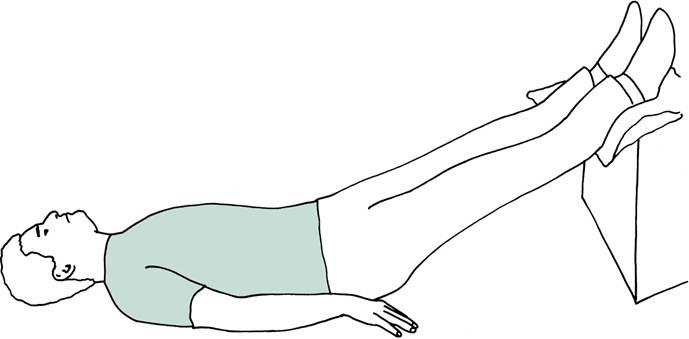
  • Severe burns: Lay the casualty down. Call for an ambulance. Be prepared to give CPR if the casualty stops breathing.
  • Keep cooling the burn until the pain subsides.
  • Put on disposable gloves if available. Gently remove any rings, watches, belts or clothing before the tissues begin to sell. Do not remove clothing stuck to the wound. Do not put any ointments or lotions on the wound.
  • Cover the wound with a clean non-absorbent dressing - clingfilm is ideal.
  • Monitor the casualty until help arrives. Treat for shock if necessary.

Shock


Treatment of shock - lie the casualty down, get help and monitor.

Shock is when there is a lack of blood flow to the vital organs, particularly the brain. The organs have a reduced supply of oxygen and a build up of waste products. Serious shock is a killer. It is good practice to assume every casualty has some degree of shock and treat them accordingly.

Casualties who have lost fluid from the body are particularly prone to shock - those suffering bleeding, burns, vomiting, diarrhoea and abdominal injuries.

Signs of shock:
Initially:
  • Rapid pulse.
  • Pale, cold and clammy skin.
  • Sweating.
Later on:
  • Grey-blue skin.
  • Weakness and gidiness.
  • Nausea or thirst.
  • Rapid, shallow breathing.
  • Weak pulse.
Eventually:
  • Restlessness.
  • Gasping for air.
  • Unconsciousness.
Treatment of shock:
  • Lay the casualty down. Lie the casualty down on soft ground, ideally a blanket and raise their legs.
  • Loosen tight clothing.
  • Get help.
  • Monitor the casualty's responsiveness, airway and breathing. Be prepared to give CPR if the casualty stops breathing.
Do not:
  • Allow the casualty to eat, drink, smoke or move.
  • Leave the casualty unattended, other than to go and get help.
REMEMBER - SHOCK IS A KILLER - SUSPECT AND TREAT ALL CASUALTIES FOR SHOCK.

Cardio Pulmonary Resuscitation (CPR)

NOTE: This information should be read in close conjuction with the Rescue Breathing and Chest Compression lessons.

Cardio Pulmonary Resuscitation (CPR):
If the casualty is not breathing by themself you must breathe for them - this is achieved by giving Rescue Breaths. If the casualty has no signs of life it is an indication that blood circulation is absent. As a first aider you must provide the casualty with circulation - this is achieved by giving Chest Compressions. The combination of Rescue Breaths and Chest Compressions is known as Cardio Pulmonary Resuscitation (CPR).

Sequence of CPR:
  • In the case of a casualty needing CPR, the primary survey will be as follows:
    • DANGER - Remove all danger from yourself and the casualty.
    • RESPONSE - The casualty is unresponsive - shout for help.
    • AIRWAY - Ensure the casualty's airway is clear and maintained.
    • BREATHING - The casualty is not breathing.
  • As soon as you see the casualty is not breathing go for help if it is not already on the way (if you suspect the casualty is not breathing due to injury, choking or drowning give 5 rescue breaths followed by 30 chest compressions before going for help).
  • After going for help give the casualty 30 chest compressions.
  • Give the casualty 2 rescue breaths.
  • Continue giving cycles of 30 chest compressions to 2 rescue breaths until either help arrives, or the casualty begins to breathe spontaneously or you become too exhausted to continue.

Rescue Breathing

If the casualty is not breathing by themself you need to breathe for them. This is achieved by giving rescue breaths (commonly known as mouth to mouth).

GO AND GET HELP, if it isn't already on the way, as soon as you know the casualty is not breathing. There is an exception to this rule - if you suspect the casualty is not breathing due to injury, choking or drowning give them 5 rescue breaths and 30 chest compressions before going for help.

Once help is on the way:

  • Give 30 chest compressions as described in the 'Chest Compressions' lesson.
  • Give 2 rescue breaths as follows:
    • Ensure the casualty's airway is kept open (head tilted back and two fingers lifting chin) throughout.
    • Pinch the soft part of the casualty's nose with your finger and thumb. Keep the chin lifted with your other hand.
    • If you have a face shield or pocket mask place it over the casualty's mouth. If not carry on without hesitation.
    • Take a breath and place your mouth over the casualty's. Maintaining head tilt and chin lift blow steadily until the casualty's chest rises. This should take about 1 second.
    • Remove your mouth and look along the casualty's chest, which should fall again.
    • Give a second rescue breath and then give 30 chest compressions.
    • Continue to give rescue breath/chest compression cycles until help arrives, the casualty starts to breathe again or you become too exhausted to continue.
If the chest doesn't rise during your rescue breath:
  • Adjust your position, check the casualty's airway is open and clear and attempt a further 2 rescue breaths.
  • If, after the 2 attempted rescue breaths, you are still unsuccessful give 30 chest compressions without delay.

Chest Compressions

Chest Compressions:
If you find that the casualty has no signs of life (breathing sounds, motion etc) you will need to give them chest compressions.

Chest compressions are given as follows:
  • Kneel beside the casualty and place your hand in the centre of their chest. Your hand should be about 5 cm (2 inches) up from where the lowest right and left ribs fuse.
  • Place the heel of you other hand on top of the first hand and interlock your fingers.
  • Lean well over the casualty, with your arms locked striaght and depress the chest 4-5 cm (1.5-2 inches). Release the pressure without removing your hands from the casualty's chest. Allow the chest to come fully up before giving the next compression. Keep a steady rythm and don't 'bounce' with your compressions.
  • 30 chest compressions should be given at a rate of 100 per minute.
  • After giving 30 chest compressions give 2 rescue breaths (see Rescue Breathing lesson).

Primary Survey 5: CIRCULATION

Primary Survey 5: CIRCULATION:
The current protocols refer to this as checking for 'signs of life'. A sign of life is normal body temperature, normal skin colour, breathing sounds and motion - if any of these are present it is a good sign the casualty still has a heart beat. There is no need to check the casualty for a pulse - indeed, finding a pulse is often difficult and too time consuming.

In the current protocols you will have already started CPR before checking for signs of life - see 'Basic Adult Life Support' and 'Cardio Pulmonary Resuscitation (CPR)' lessons.

Primary Survey 4: BREATHING

Primary Survey 4: BREATHING:

Once the airway is open you must check that the casualty is breathing.

Check for breathing by:
  • Placing your ear next to the casualty's mouth and looking down their chest.
  • Look, listen and feel for breathing sounds and motions for not more than 10 seconds.
If the casualty is unresponsive but breathing place in the recovery position - see 'Recovery Position' lesson.

If the casualty is unresponsive and not breathing you need to give CPR - see 'Basic Adult Life Support' and 'Cardio Pulmonary Resuscitation (CPR)' lessons.

Primary Survey 3: AIRWAY

Primary Survey 3: AIRWAY:

The airway runs from just outside the casualty's mouth down to their lungs. You must ensure the airway is maintained - clear and open at all times.

If necessary open the airway by:

  • Opening the casualty's mouth.
  • Check inside the mouth and carefully remove any obstructions.
  • Tilt the casualty's head back. Do this by placing two fingers of one hand on the casualty's chin, the other hand on the casualty's forehead and gently rocking back the head.

Primary Survey 2: RESPONSE

Primary Survey 2: RESPONSE:

After removing any danger from yourself and the casualty you need to quickly assess the casualty's level of responsiveness. This is to make sure they really do need help and aren't just asleep or behaving unusually.

The casualty will fall into one of the following categories:
  • ALERT - a casualty who is talking and aware of their surroundings.
  • VOICE responsive - a casualty who responds to a verbal command.
  • PAIN responsive - if they don't respond to a verbal command pinch their ear lobe or back of hand to see if this provokes a response.
  • UNRESPONSIVE - a casualty who doesn't respond to a verbal command or painful stimulus.

Primary Survey 1: DANGER


Primary Survey 1: DANGER:

The very first thing you should do when you approach a casualty is check for danger to yourself - we don't want two casualties and no-one to summon help. It is tempting to rush straight to the aid of an injured person - don't. Try and compose yourself and take few seconds to look around and check the scene is safe beforehand.

Remember to look for hidden dangers like electricity, overhead hazards and poison gases.

Remove the danger from the casualty before you try and give first aid.

Primary Survey

Primary Survey:
The primary survey is the action you should take every time you come across a casualty. The primary survey has 5 parts to it:
  • DANGER - check the scene for danger.
  • RESPONSE - check the casualty's responsiveness.
  • AIRWAY - check airway is clear and maintained.
  • BREATHING - check the casualty is breathing.
  • CIRCULATION - check the casualty for signs of life.
Use commonsense when doing the survey - a casualty who is talking has a clear airway, is breathing and shows signs of life so there is no need to check!

See the 5 lessons which accompany this entry.

Choking


Recognition:

Choking is caused by a foreign object becoming lodged in the top of the airway. Choking comes in two categories - mild and severe. In all cases the casualty will be in visible distress, trying to gasp for breath and will become discoloured in the face. A casualty with mild choking will be able to cough out the obstruction by themself. In the case of severe choking the casualty will struggle to cough, speak and breathe - they need urgent help to remove the obstruction before they lapse into unconsciousness.

Treatment (Adult or Child):
If the casualty appears to be choking:
  • Ask the casualty to cough. If the obstruction becomes dislodged remove it from the casualty's mouth.
  • If the obstruction remains give the casualty up to 5 sharp back blows:
    • Strike between the shoulder blades in a firm upwards motion.
    • If the obstruction becomes dislodged remove it from the casualty's mouth, if not perform abdominal thrusts.
  • If the obstruction remains give the casualty up to 5 abdominal thrusts (picture above):
    • Put your arms around the casualty from their back to front.
    • Position your hands over the stomach of the casualty.
    • Make a fist with one hand and grasp the fist with the other hand.
    • Firmly pull your fist in an inwards and upwards motion.
    • If the obstruction becomes dislodged remove it from the casualty's mouth.
  • Give two more cycles of back blows and abdominal thrusts if the obstruction is still not clear.
  • If the obstruction is not clear after your 3 cycles of back blows and abdominal thrusts call 999.
  • Continue until help arrives.
Treatment (Infant <1 year)
If the child is visibly distressed, unable to cough or breathe:
  • Lay the infant along your forearm with their head low and support their back and head.
  • Give up to 5 back blows:
    • Be firm but not too hard.
    • If the obstruction becomes dislodged remove it from the casualty's mouth.
  • If the obstruction remains turn the casualty on to their back and give up to 5 chest thrusts:
    • Use two fingers, push inwards and upwards (towards the head) against the infants breastbone, one finger's breadth below the nipple line.
    • The aim is to relieve the obstruction with each chest thrust rather than necessarily doing all five.
  • Give two more cycles of back blows and chest thrusts if the obstruction is still not clear.
  • If the obstruction is not clear after your 3 cycles of back blows and abdominal thrusts call 999.
  • Continue until help arrives.

Chest Pain


Unless there is obvious evidence to the contrary (eg. someone has just been winded playing sport) always assume the worst when it comes to chest pain - treat as a heart attack.

Angina is another possibility. If the casualty is having an angina attack they will usually know about their condition, have medication and tell the first aider about it.

A heart attack occurs when the coronary artery, which supplies the heart muscle with oxygenated blood, becomes occluded - this causes the muscle beyond the occlusion to die. Angina is due to temporary narrowing of the coronary artery - this results in less oxygenated blood getting to the heart muscle.

Signs and symptoms:
The casualty will complain of persistent 'crushing' chest pain maybe radiating to their neck, jaw and arms. They will normally be breathless, have pale 'ashen' skin and possibly blueness of the lips (called cyanosis). Their pulse will be rapid, weak and irregular. It is also common for the casualty to be cold and clammy to the touch. Vomiting and nausea are also common symptoms.

Treatment:
All Cases: Sit the casualty down in the 'W' position.
Angina: If the casualty has medication for their condition help them to take it.
Heart Attack: Dial 999 ASAP.
Angina: If the casualty's condition doesn't ease within a few minutes of them taking their medication call 999.
All Cases: If possible give an adult casualty (not a child) an aspirin tablet to slowly chew. Monitor the casualty closely until help arrives - keep a note of pulse and respiration rates. Be prepared to give CPR if the casualty stops breathing (see Adult Basic Life Support).


First Aid Kits - What to Include


First Aid Kit Contents:
The contents of your kit depend on where it is going to be located. A home kit will be more basic than a kit located in a large shopping mall. A travel kit may include items you don't necessarily use at home.

My recommendations for a home kit:
20 Plasters (assorted shapes and sizes)
1 Large wound dressing (for bleeds)
2 Medium wound dressings (for bleeds)
1 Eye pad
2 Triangular bandages (for support)
2 Crepe bandages (for support)
2 Non-adherent dressings (for burns)
Safety pins
Tuff cut scissors
Face shield (for giving CPR)
Antiseptic wipes
Disposible gloves (nitrile preferred to latex)
Guidance leaflet

My recommendations for a work kit:
20 Plasters
2 Eye pads
4 Triangular bandages
6 Medium wound dressings
2 Large wound dressings
4 Crepe bandages
4 Non-adherent dressings
Safety pins
Tuff cut scissors
Face shield (for giving CPR)
Antiseptic wipes
Disposible gloves (nitrile preferred to latex)
Guidance leaflet
List of qualified first aider's names and contact details

Key Points:
1. Remember to keep your kit in a prominent location. Make sure everyone in the home knows where it is. In the work place make sure employees know where the kit is and who the qualified first aiders are.
2. Regularly check your kit to make sure the contents are present and still in date. Be sure to replace contents which are absent or have expired.
3. Replenish your kit every time you use it.

Adult Basic Life Support


Adult Basic Life Support:
If you find a casualty who is not breathing you need to breathe for them by giving them Rescue Breaths. If they show no signs of life (no obvious signs of circulation) you also need to give them Chest Compressions. Chest Compressions are vital for pumping oxygenated blood around the casualty's body - particularly to their brain and other vital organs.

This is summarised in the flow chart above (click image to enlarge).